Pages

Monday, December 19, 2011

Santa Stache

I had a cookie swap this year and I think it's going to be a Christmas time tradition, and not just because everything was yummy, it was a great group of women and we had an awesome time!
I'm not saying we had more fun because of our Santa mustache cups...but that was probably a huge part of it, how can you not smile and laugh looking at this:

To make them I bought white foam board at the craft store, traced and cut out a bunch of mustaches and then used regular old scotch tape to stick them to wine glasses! Serve with Santa Sangria (Wine, diet Sprite, triple sec and lime juice) , and Elf Elixer (Juice and lemon lime seltzer water) and voila, holiday cheer:

I also made a crescent roll wreath, which I've never done before but tasted fabulous and looked ridiculously festive:

And of course, our cookie assortment...does it get better than this?


Definitely a tradition in the making!

Thursday, December 15, 2011

It's a whipped up racket!!

Whipped cream cheese and I used to have a love/hate relationship, so much easier to spread than block cream cheese, but for some reason 3 times more expensive.
We now have a solidly love/love relationship since I started making my own.
Take THAT Philly and your ridiculous $3.85 tub of cream cheese that's mostly just air! You won't be reeking your wallet havoc in this house anymore!

So, thanks to my Kitchen Aid and 4 tablespoons of milk, I turned two blocks of "sure to demolish a toasted english muffin" in to light, fluffy, super spreadable goodness. That's right, just put two blocks of cream cheese in your Kitchen Aid (a handmixer with a whisk attachment would work too), put on the whisk attachment, and add 4 tablespoons of milk, and whip on medium/high speed for 5-6 minutes. Use the savings to get yourself an afternoon coffee.

It's not the best picture, but you get the idea:

Sunday, December 11, 2011

Christmas Wreath

I have a total backlog of blog stuff to post! I had to choose between this, the yummiest breakfast ever, and a little party hosting "cookie swap" blog. So I will start with the Christmas wreath and you can look forward to the other two in the next few days!

Pinterest is such a great place to get new ideas from! I made a Christmas wreath for the front door and started with a 6 foot long piece of foam pipe from the plumbing section of Lowes. Never in a million years would have come up with this if I hadn't seen it on Pinterest.

You will need: Foam piece, duct tape, various fabrics, hot glue, embellishment (I used mini jingle bells)
Here are the steps:
Cut the foam to desired size for your wreath, I cut it down to 4.5 feet.
Cut a piece of fabric 1" wider than the width of the tube, and 1" longer than the length.

Pin the fabric right sides together and sew in to a tube, open on both ends.
Slide the foam piece in to the fabric tube.

Duct tape the tube together.

Pull the fabric together to cover the entire tube and hand stitch in place ends together.
I made a little door hanger with fabric at this point and wrapped it around the top of the wreath, but you could easily sew on a loop of ribbon and it would work just as well.

Next cut three pieces of fabric about 20-25 inches long and 3-4 inches wide. I used three different fabrics for this. Fold them in half the long way, with right sides facing out and sew a basting stitch across the top, do not back stitch at either end. Tie a knot in one end and then holding one piece of the opposite thread begin gathering the material in to a ruffle. (There are awesome videos on You Tube if you search for "how to make a ruffle")

Roll them up counter clockwise in to flowers.

Hot glue the flowers on the wreath, using embellishments in the center if you wish. I think that gems would look really adorable here too. I added a little red sparkly something that I had lying around from a Michaels after-Christmas super sale two years ago.

When I hung my wreath because the foam base is so light it titled toward the embellished side so I had to use duct tape to secure it straight up and down.

Love it!

Thursday, December 8, 2011

Picture Christmas Cards- My husband is a grinch

If you ever want to see my husband, a normally mild mannered, agreeable man, go off on a tirade of epic proportions ask him about picture Christmas cards.
He loathes them.
Truly.

He hates them in the following order, with hatred being multiplied exponentially as the list goes on:
1. Pictures of children
If I know you well enough to be getting a Christmas card from you, I've seen your kid in the last two months, he doesn't look much different now. What a waste of a stamp.
2. Pictures of entire families, all in white shirts, on the beach
You're a bunch of pretentious a*holes.
3. Pictures of just couples
Seriously dude? What am I supposed to do with this? It's creepy enough when I stick a picture of someone else's kid on the fridge. What will people think of me if they see a picture of a 30-something year old couple?
4. Pictures of pets
Throw it out! Don't even think about putting that on our fridge! What is wrong with people? No one likes your dog as much as you do. NO ONE! (Please note, this reaction is much, much worse if it is a pug...Linds, I'm talking to you)
5. Pictures of pets dressed in Christmas clothing
This is the worst thing humanly possible to do, not just for a Christmas card, but in life in general. It should be a federal offense. And your dog hates you for it.

So what did I do today you ask?
I ordered our Christmas card, with a picture of our daughter on it.
I think that it's a compromise that I didn't put his mug on it, and I only ordered 12 so they won't be flying about New England attached to fridge's of 3rd cousins.
But she's so damn cute I couldn't resist showing her off a little.... I'm an offender, and I'm willing to take the tirade.

Wednesday, December 7, 2011

Holiday Decorations

Thought I would take this post to share a few of my favorite holiday decorations in my house.
We had a great time setting up for Christmas on Sunday, we put on A Christmas Story, busted out the ornaments, and repeatedly told our daughter that Christmas was still REALLY far away, and Santa only brings a few things. This is something we've been reiterating lately, lest she get caught up in what she sees in her rare moments of TV watching, or hears from playmates. We are firm believers in making Christmas about sharing a special time with family and friends and enjoying each others company, and being grateful.

That said, I do LOVE how the house looks decked out for the holidays and I think there's something super special about welcoming the season by bringing some additional sparkle in to our house (because honestly, sparkle rules).

Ornaments hung from our dining room chandelier with regular wrapping ribbon, just curled the ends. I would have used fancy ribbon but it's a pain in the bottomus to get through those teeny ornament hanger holes.

This is a super fun cookie jar that my aunt bought us a few years ago and every time I unwrap it I smile! Cookies only last in there for about a day, but it's so whimsical and fun! The other item is a hot chocolate frother. You may have seen these out and thought "That's ridiculous why would anyone buy that?" well let me tell you, you're missing out if you left it on the shelf. It delivers hot chocolate that is unparalleled and kids love using it. If you see one for $15 or under get it!

This is my little snowman family, from left to right, a sugar bowl, creamer, salt and pepper shaker. So tacky. So fun. Sometimes you've got to roll with the ceramic snow figurines and revel in your holiday lack of taste. Own it.

Monday, December 5, 2011

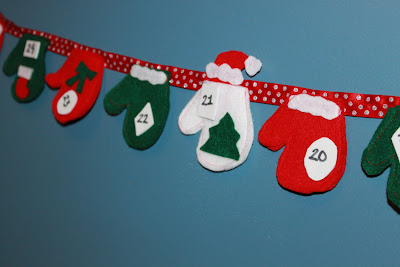
Mini Mitten Advent Calendar

This project is super fun! I created a mini-mitten advent calendar for my daughter to start counting down the days until Christmas. We are moving a Santa hat from day to day, but when she's older I'm going to put little activities for the day in each mitten, like make hot chocolate or do something special for a friend.

It is fairly simple, I used a sewing machine for a lot of this, but I would imagine that a hot glue gun would do the job as well, I'm just not sure that it would last as long as sewing.

What you will need:
Felt, ribbon, foam board, hot glue gun, sewing machine, scissors

1. Cut a mitten out of the foam board, use it to trace 50 mittens. In my case I used 20 red, 20 green and 10 white.

2. Cut small shapes out of the foam board and write 1-25 on them with a Sharpie. Let dry.

3. Divide the mittens in half. Hot glue the numbers and small embellishments to one set of mittens.

In my tradition of refusing to use photoshop on my blog I would like to note that yes, I'm aware that my iron needs a new cover.
4. Arrange the mittens that do not have embellishment on them uniformly apart on the ribbon. Sew a straight line down the ribbon, attaching the mittens.

If I didn't already have the advent calendar plan in my head I would have just used this as a garland because it's super cute by like this.
5. Place the embellished mittens (in descending order) over the mittens that make up the garland. Pin in place.
6. Sew each mitten, leaving the top part open to use for either a "marker" (like our Santa hat) or to insert messages/activities.

Sunday, December 4, 2011

Date Night Outfit

The husbando took me on a fantastic dinner date for my 30th birthday!
We went to Trattoria Della Nonna in Mansfield, and everything we ate was phenomenal! Specifically the cheesy mushroom dip, which had some kind of delightful fried dough of some sort covered in shredded parmesan, it was glorious.

I love getting ready for date night! Here's what I wore:

The sweater (Banana) and skirt (Target) are both about 7 years old, but still in good condition.

The tights I got at Aldo for $15, which is way more than I would normally pay for tights, but it was well worth it because they have gold thread in them and I adore the shine. The shoes are last year's Steve Maddens, and I wear them all holiday season, every chance I get.
But the REAL star of the outfit is of course, the Kate Spade ring (my first ever Kate Spade purchase!), that was originally $98 and I scored it at the outlet for $20.83! Best. Find. Ever.

Friday, December 2, 2011

Sharpie fabric markers RULE!

My husband truly know the way to a crafter-wife's heart.
For my birthday he bought me Sharpie fabric markers!

I knew immediately what my first project would be, it's not even completely finished but I had to share!

I have this beautiful mustard t-shirt, fits like a glove, perfect weight, everything just right. So of course, I put it in the wash and it came out like this:

If I knew what the offending item of clothing was that bled all over this I totally would have burned it to prove a point.

Solution: A piece of lace with a pattern that I adore, and a navy blue Sharpie!
I tacked the piece of lace on to the shirt, and used the Sharpie to trace the pattern lightly over the shirt.


If I didn't love this lace pattern so much I would have used a bigger piece, but I didn't want to waste it. It's a bit of a pain having to take it off and realign it so often, so if you try this use a larger piece of lace.

This is what it looked like when I filled it in completely, then I removed the panel, lined it up with the fabric marker and started the process over for the next section of shirt.


So far, this is what it looks like. I am happy with the Sharpies for a few reasons, they glide pretty seamlessly over the fabric, and the color stays true. So even though this navy is on mustard it hasn't taken on a greenish hue which is key. However, I'm about half way through the shirt and I think the marker is running out, so they get a "minus" for durability.

I promise an outfit post with the completed shirt in the next few weeks! (Christmas crafting may get in the way of finishing the back half of the shirt!)

Thursday, December 1, 2011

Nothing to do with the kids this weekend?

I adore The Children's Museum in Easton for many reasons, the focus on play, the variety of activities for different ages and interests, but mostly because it's the best deal on the South Shore.
A family membership is $80 annually, and there are drop in activities galore. My absolute favorite of which is Wednesday and Thursday at 10am when the downstairs is turned in to Sing-a-long central with kids generally ages 18 months-4 (though I'm sure there is variation on either side) singing and dancing up a storm!
There are also dinosaur days, art days, and a bunch of fun extra activities that are mostly free for members with the occasional small fee. So basically instead of paying $80 for one month of music class at Isis, it's $80 for the whole year, and there is a ton of stuff to do. I know that Isis has value in it's own way as well, but for those of us who just can't stomach that kind of cost The Children's Museum offers so much for such a low cost.
This is a GREAT holiday gift for the family with young children in your life!

SO back to the post title: This weekend they are doing a Gingerbread Day on Saturday and Sunday, check out the website for hours. The event is free for members, with a $1 donation to decorate a cookie. Honestly, $1. I do have to throw in the caveat that I will not be attending this (I'm totally going holiday shopping instead), but my husband is excited about checking out the new spaceship with Belle!

Do you have a Children's Museum membership? What do you think?

Wednesday, November 30, 2011

Peppermint Chocolate Filled Cupcakes

Peppermint Chocolate Filled Cupcakes: An Andes mint in a pretty little wrapper!
I made these 11 days ago for my lovely friend's 30th birthday.
I can't believe I haven't posted about them yet!

To start with I did something that I NEVER do (mostly because I had limited time, and also because it had been a long week and my baking motivation was hovering around a 3 on a scale of 10) I used boxed chocolate cake mix.
Please continue reading, I know, I know, it was a horrible thing to do.

So, of course I had to snazz the cake mix up! I lined and filled 24 cupcake tins.
Put them in to bake per the directions on the box (shudder) but then I added the secret ingredient!
After 5 minutes in the oven I pulled them out and added a Mint Truffle Hershey Kiss to each one.
They immediately started to sink below the surface and it looked amazing!
Please ignore the cake batter splashes on the muffin tray, as I said in an earlier post I don't photoshop, I show it like it is! Dirty pan and all.

Then I topped these delectable goodies with a homemade peppermint buttercream frosting, insanely easy to make:
In a mixer combine:
1 stick of softened butter
3.5 cups of powdered sugar
3 Tbsp milk (preferably whole)
1 tsp peppermint extract
5 drops of yellow food coloring, 1 drop of blue food coloring (optional)

Voila! Peppermint Chocolate Filled Cupcakes!

I totally made a rookie mistake here and forgot to cut on in half and take a picture of the Hershey Kiss floating in the middle. It was glorious!
Next time (and there definitely will be a next time) I'm making these with caramel Kisses dropped in the middle and a dulce de leche frosting. Drool.

Tuesday, November 29, 2011

My horrible neglect of the blog

WOW!
12 days without a post, that is just full on out of control!
Thing is, I've been super busy, crafting, baking, prepping for Thanksgiving, turning 30 (freakout) and I guess I just forgot to share it all on here.
So this is my holiday resolution: I'm back to posting every day through Christmas!
Because there is no better time than the holiday season to share fun ideas and craft our little hearts out!

So....here it goes!

Thursday, November 17, 2011

Salted Caramel Pretzel Bark...aka Heaven

This is so easy it's wrong.
I vow here and now to only make this when I'm bringing it to someone else's house. Dangerous.

First, the ingredients:
2 sticks of butter
1 cup of light brown sugar
1 bag of pretzels (you'll use about 3/4 of the bag)
12 ounce bag of chocolate chips
Sea salt
Two quick notes on ingredients, I would use the "snaps" pretzels because you'll get a more even covering of the bottom of the pan. Also, if there is a Trader Joes within 20 miles of you drive there and stock up on chocolate chips. $1.99. That's right, $1.99.

Preheat the oven to 400.
Line a baking sheet with aluminum foil, cover with pretzels (you don't have to do the super neat grid I did, it just made me feel all aligned and happy).
In a medium saucepan melt the butter over medium-low heat. When it begins to bubble add the brown sugar. Stirring occasionally let the butter/sugar mixture meld together and brown. This should take about 3 minutes. Do NOT let it boil, you will have sticky goo that is no good. And if you can afford to lose two sticks of butter to a failed experiment why are you even reading a DIY blog? (Call me, I'll make the bark, you can pay me and pass it off as your own, win, win.)
When you have a nice, brown caramel pour it over the pretzels, slowly and evenly. You can then use a spatula to spread it out, you have to work quickly and gently. It hardens fast so even pouring is the best method.
Bake the sheet for 5 minutes.
Remove the sheet from the oven and sprinkle the whole bag of chocolate chips evenly over the mixture.
Place back in the oven for about 45 seconds. If you let it sit there too long the chocolate will burn.
Remove from the oven and use a silicone spatula or the back of a spoon to evenly spread the chocolate over the top.
Sprinkle with sea salt and refrigerate for a minimum of 1 hour.

Break in to pieces and put in a cute little box lined with parchment paper.
Perfect hostess gift.

Sunday, November 13, 2011

I hate to talk Christmas already...

BUT, there was a project I had to start early!
First a quick note: I can't believe I've been MIA on this blog for so long, had a lot of stuff going on and wasn't feeling particularly creative, but I'm ready to get crafting again, and I'll be back in full force starting this week. Especially since theoretically I'm making Belle and I our Thanksgiving dresses....

So, here's a quick, super easy, super cheap gift that is great for any family with kids.
If your handwriting is anything short of horrific you can totally do this project!
Make a personalized cookies for Santa plate!

First, buy a plain white ceramic plate. At Christmas Tree Shop they are a whopping $0.69 a piece.
Then, purchase red acrylic paint intended for glass and ceramics, a startling $1.89 at Michaels.
Next, paint your message to Santa, let sit and dry for 21-25 days to assure that when you wash it the paint won't run off.
Mine isn't done yet, just one coat (it will need two), and I think I'm going to draw a little Christmas tree in the middle.

A few tips, be sure to wipe the ceramic with rubbing alcohol before you start to get rid of any finger prints. And if there's anything you don't like, just take a wet paper towel to it immediately and it will wipe away. So no fear on experimentation.

Wednesday, November 2, 2011

Buffalo Burgers

Buffalo burgers with baked fries
So quick and easy, I absolutely love this dinner, probably because the husbando and I are both huge fans of super spicy, and anything that takes 20 minutes is ok in my book!

Start the fries first, they can bake while you're making the burgers.
Preheat the oven to 425, cut two baking potatoes in to shoe-string fries. Toss with about two tablespoons of olive oil and 1/2 tablespoon of kosher salt. Bake on a baking sheet for 12-15 minutes, until the bottoms are brown.

For the burgers, make 4 patties from a pound of ground chicken (you could sub in turkey, but I wouldn't do beef because it will take over the buffalo sauce flavor), cook until done, about 7 minutes each side over medium heat. Remove from the pan, reduce the heat to low. Melt 1 tablespoon of butter and 1/4 cup buffalo sauce in the pan. Return the burgers to the pan, turning to coat with the sauce. Then place either Monterey Jack or blue cheese on top of each burger, cover and melt the cheese (about 45 seconds). Serve on rolls with tomato, lettuce and red onion.

Such a delicious meal, so little effort! Enjoy!

Tuesday, November 1, 2011

Wow proven wrong...times two.

I had two big "Nicole, you're a close minded fool" moments today.

1. Jessica Simpson actually announced her pregnancy in a witty fashion. Surely that is the first time "witty" and "Jessica Simpson" have appeared in the same sentence but I was pleasantly surprised at her Halloween "Mummy" pun.
Do I know that the credit for this probably goes to her publicist? Of course I do. But I'm flabbergasted nonetheless that I thought she did something intentionally humorous.

2. Pumpkin ice cream is freaking delicious.
I know, I know, could anything sound less appealing? Pumpkin mixed with ice cream, I scoffed at my mother for wanting to try it.
I will eat my words.
It is absolutely phenomenal.
Go out and buy it! Immediately!
We had the Trader Joes variety (which is probably the best because, duh, its TJs), and it tastes a more eggnog-ish than pumpkin. It is glorious.

So today I basically spent the day being reminded that sometimes I'm just a moron, and entirely too quick to judge. Though, in my defense Ms. Simpson has been proving herself a dimwit for a while now.

Monday, October 31, 2011

Poncho, Poncho

I love the way ponchos look...on everyone else.
But every time I put one on I feel like I can't quite get it right.
Hence I have had this poncho for 4 years and couldn't figure out how to wear it:
So I decided to just call a spade a spade, I cannot wear ponchos.
So I made it in to a sweater!

Step 1: Remove cowl neck, veeeery carefully so the neck hem remains in tact.
Step 2 Put poncho on inside out, and pin where you have to sew to make sleeves.
Step 3: Sew the sleeve seam, then carefully cut along it
Step 4: Sew the seam closed that will now be the body of the sweater on both sides.
Step 5: Turn right side out.
I added a Step 6: Sew fabric to pockets because I had this fun fabric and loved it.
And if you have a two year old girl I recommend Step 7, which is sew a piece of fabric around the bottom of the cowl neck, insert elastic, new skirt!

Thursday, October 27, 2011

"Diva in Training"

At my little cherubs weekly sing a long today there was a girl with a shirt that said "Diva in Training".
There are many, many things that I wanted to say to her mother but I didn't because I was trying to stay in the confines of polite society and I was too busy moving Belle away from that girl lest she inadvertently become friends with her.

Following is a small rant of the things that are wrong with calling your daughter a "Diva in Training".
Self-confidence is wonderful, all little girls should have it, we should all do our best to teach our girls to be proud of who they are.
Self-importance is something entirely different. It is a horrific attitude that basically amounts to "I'm better than you, more important than you, and you should do stuff for me". This is dismal behavior in an adult, in a child it's so grotesque that it inspires a physical reaction in me, blood pressure rises, and I find myself wanting to assault the parents who cultivated that attitude.
I imagine that these Diva-children end up being the kind of self-absorbed horror shows that expect people to hold umbrellas for them (I'm looking at you Beyonce), who want people to see them work out in high heels (I'm looking at you Mariah), and who think that all the rules of society apply to everyone but them including silly little things like laws (Paris Hilton, your turn to get the evil eye).

But, the thing that really bothers me the MOST about a mother being proud that she has a "Diva in Training" is that this poor child is going to grow up without knowing the joy of what it means to help your fellow man.

I know that probably sounds a bit extreme, but it is this kind of attitude cultivated at a young age that causes children to lose their innate abilities of empathy, caring and compassion. If this little girl starts out now thinking that others are meant to serve her will she ever know what it means to serve others? To make a meal for someone, to help a friend, to give a stranger change for the parking meter, to hold a door open for a woman who has an arm full of groceries, to assist an elderly person in the grocery store.

It is time that we stopped teaching children that they are the only important thing in the world, that there needs come before anyone else's. It is not only severely detrimental to them, but to the vast majority of our future society if we continue to cultivate Divas.

Wednesday, October 26, 2011

Pumpkin Cinnamon Rolls

This summer I was fortunate enough to stumble across a cinnamon roll recipe that I have had since probably 2002 or so. It was from Vegetarian Times magazine, and I remember ripping it out and thinking "Wow, that's the only cinnamon roll recipe that has ever seemed easy enough for me to actually try making".
Apparently after saying that I never made it.
Until this summer.
And they are in face glorious, and easy cinnamon rolls.
However, since it's fall, I had to do them up Autumn-Style!

Honestly, at the moment I don't have the energy to type out the whole recipe, I promise I'll update that part soon.
But the important part is:
If you're making cinnamon rolls with any recipe, even pop-open-the-can, you can make the delicious pumpkin frosting that really makes these special.

Whisk together:
2 Tbsp canned pumpkin
2 Tbsp whipped cream cheese
1/2 tsp vanilla extract
1 - 1 1/2 cups of confectioners sugar
Spread over the rolls while they're still warm after they come out of the oven.
Heaven.

Tuesday, October 25, 2011

Gratuitous Outfit Shots

Ok, it's official.
I need a new location for my outfit shots.
I hate them.
They look so posed and ridiculous. Suggestions please!!

But I will share these with you because I love the outfit I wore today to showcase my zebra heels!