So an entire month has gone by without time to blog.
I think I'll figure out this week whether I'm just going to shut her down, or recommit.
The problem is: I'm diligently working on my novel. Actually making progress.
Which means that any free minute I have (and they are few and far between) is spent typing at maximum speed trying to eek out 10-15 sentences for the novel.
I'm still working on tons of projects, I just don't have the time to put in to creating thoughtful, well done posts for them.
Soul searching is in order.
Sunday, April 22, 2012
Monday, March 26, 2012
Save your chin- The towel holder
Here is an item that my husband fully does not understand: The towel holder.
It's super simple, just two clips that hold up the towel for when you're getting your little one out of the bath.
Am I the only person who does the chin down to the towel, try to hold it up, while struggling to get a little wet, slippery body out of the tub?

Also, SUPER helpful for when your child decides that splashing like a lunatic is the most fun that can be had in life but YOU have on an outfit that you really like and actually want to wear out of the house that night.
How can my husband not think that this is the most brilliant idea ever?
So easy to make!
Materials:
Piece of fabric approximately 23 inches long and 4 inches wide (to determine length measure from one collar bone, around the back of your neck to the other then add two inches)
2- art board clips (found at Michaels in the same aisle as the fancy paint brushes)

1. Fold the fabric in half the long way and iron a crease down the middle.
2. Unfold the fabric, then fold each long side in so that it meets in the middle.

Fold this in half and press. Now you have a strap.
3. Stitch the strap closed.
4. String each end through the hole at the top of the art clip.

5. Sew the end to the strap, so that you have one art clip hanging on each side.

Thursday, March 8, 2012
Buffalo Chicken Nachos...you will thank me.
I love buffalo chicken, I love nachos, I am through the freaking roof with joy when I can combine them together.

Here it is, my buffalo chicken nacho recipe, no the measurements are exact, these are nachos, experiment a little:
Ingredients:
1 can of black beans, rinsed and drained
1 garlic clove
Juice of 1 lime
1/2 pound chicken, boiled and shredded
Franks Red Hot Buffalo sauce
Bag of tortilla chips (I like Santitas b/c they're yummy and $2)
Small can sliced olives
1 tomato chopped
2 scallions chopped
6 ounces of shredded cheddar
2 ounces crumbled blue cheese
1. Combine first three ingredients in a food processor (a hand held blender will work fine too), set aside
2. Toss shredded chicken in Buffalo sauce depending on your taste, I use almost a half a bottle
3. Lay a single layer of chips on a baking sheet (preferably with a rim)
4. Top with dollops of black bean dip, followed by evenly sprinkling chicken over
5. Evenly distribute scallions, olives and tomato
6. Top with shredded cheddar and blue cheese
7. Bake at 350 until cheese has melted
You could serve these with salsa or sour cream, but the black bean dip pretty much makes it so that they don't need any additional condiments.
Again, since they're nachos these are just my preferences, you may want more or less chicken, same with the cheese. I personally don't like to "overcheese" my nachos so this is on the lighter side.

This is how they look before cheese, could easily be eaten dairy free.
Feel free to post any questions!
Wednesday, March 7, 2012
Wall Art Redo

So the husbando and I had a beautiful, delicate, super awesome paper cut out hanging in our room, but it was in this really horrid plastic frame that I just never bothered to replace. We bought this mind you about 6 years ago from a street vendor by Harvard, and it's supposed to bring good luck. We also had this super horrid wine "art" that the husbando was a fan of but I just couldn't bring myself to hang up on the wall, so I combined them!

Started by wrapping the offensive wine picture in fabric, stapled it right to the back.

Then I very, very carefully removed the paper cutout, which was brittle when we bought it I'm sure since it's so delicately cut, but way more brittle being 6 years old.

Then I trimmed it to fit and "ModPodged" the paper directly on to the fabric. This was an extraordinarily delicate process, and I did get some cracks/breakage in the paper but I don't feel that it hurt the finished look.

And yes, when the color started to run I had a little panic but everything turned out fine.

So we have saved two pieces of art that were "meh" and it's the new inspiration for my total bedroom redo which I will be talking about next week. I need loads of ideas.
Sunday, March 4, 2012
Sunday afternoon date
Is there anything better than a Sunday afternoon date?
The husbando and I haven't had time to get out lately, we've had a ton going on, and we don't want to overuse our babysitters so we haven't had any one on one date time in about 3 months. Which usually isn't a big deal for us, but I'm pregnant, and I'm feeling the need for some attention. Like one on one attention that doesn't involve simultaneously cutting up my daughter's lunch and frantically searching for crayons to keep her occupied.
Like real date time.
So today my husband took it upon himself to coordinate babysitting services with my mom and surprised me with a little afternoon date time!
We went to PF Changs and then did some crazy fun, cheesy, candlepin bowling! I truly had forgotten how much harder candlepin is than regular bowling. Like whoa.
We went to Needham Bowl, which is an awesome little 8 lane candlepin place! We were surprised to find that they had all day Cosmic Bowling on Sundays so my white dress was glowing in the black light and we were jamming out to music and totally played the whole time with bumpers. And we were still awful.
Truly though, I was also super excited about my outfit, here are a few gratuitous outfit shots:

The dress is from Levi jeans forever ago... but it is perfect maternity wear.

The bangles have been collected over the years from little stores here and there, I think the striped one is from Puerto Rico and the yellow one is from Newport. Purse was my moms in the 70s, I've used it more in the last 2 years than she did in the last 2 decades. Love.

And the finishing touch, my gorgeous hand knit legwarmers from my super clever friend Ms.Burney!
Thursday, February 23, 2012
$3.10 maternity shirts
I loathe the cost of maternity wear.
It's rarely cute, always poorly made, and only occasionally on sale (though never the right season).
If I find a cute $8 top I practically dance in the aisle at Target.
So my $3.30 a piece maternity shirts require the following supplies:
3 pack of men's v-neck white t-shirts $6 on sale
Sharpie fabric markers $20 for a set of 8 ($2.50 each but I'm only counting them as $1 in my calculation b/c I didn't come close to using the whole marker on one shirt)
Elastic (about $0.30 worth)
Scrap fabric
Spare stencil optional if like me you can't draw
I made them in two styles, one using scrap fabric to make an empire waist, the second sewing elastic directly to the sides of the shirt to create rouching, therefore a little pouch in the front.


For both versions you want to start by using the fabric markers to decorate a part of your shirt. Use your stencil to draw a pretty pattern, or freehand it if you've got that kind of skill. I chose to do a little something up top by the neckline, and a larger area of color on the belly and side:


Empire waist version:
Measure the width of the shirt two inches below the armhole seams.

Cut a piece of fabric twice that length (so it will go all the way around the shirt) plus an inch, and 3 inches wide. Fold the long sides of the fabric under about 1/4 inch and iron.
Sew the fabric on to the shirt 2 inches below the armhole seams. Leave the ends open. This will create a long pocket for your elastic to be threaded through.

Measure under your bustline and cut a piece of elastic (I used 1/4") one inch shy of that number.
Attach a safety pin to one end of the elastic and thread it through the fabric. Secure the elastic ends together (hand sew or machine will work for this).
Fold the ends of the fabric over each other and sew the fabric tube closed.

Side rouching version:
Measure from 2 inches below your armpit to your hip bones. (For me this was 8 inches)
Cut two pieces of elastic (I used 1/4") to that length.
Flip the shirt inside out and pin one end the elastic two inches from the armpit seam and the other end two inches from the bottom of the shirt. Do this on both sides.

Sew the elastic directly to the shirt, stretching the elastic as you sew to fit the shirt.
I used a straight stitch for this. If your thread is catching in your elastic considering turning down the tension.


Looking at this picture I'm definitely going to go back and add more pink and black to the belly part of this shirt. It was hard to judge how much would be too much, but I feel more neon is in order. Thoughts?
Also, for size calculation purposes, I bought a men's large and I'm normally a women's medium. They do look a little big now, however, I'm not due until June 24th so when they're getting the most wear (warm weather) they will probably barely contain the belly.
Friday, February 10, 2012
DIY Tory Burch pom pom scarf
Saw this on Blake Lively in In Style and I fell in love:

THEN I saw a similar one in hot pink (which I can't find a photo of) and that did it, even though it's not really close enough to Spring to DIY a scarf for semi-warm weather I went ahead and did anyways.
This is super easy, I did it on my sewing machine but honestly wouldn't take much to do by hand.
Materials:
2 yards of fabric, 18 inches wide- I used a jersey knit that I had laying around, but
you could totally do this with a t-shirt that you don't plan on wearing anymore.
2 yards of pom pom trim from the interiors section of your fabric store. I assume that this is
usually used to trim curtains or pillows.
Coordinating thread
1. Pin the pom pom trim to the long side of your fabric

2. Sew it on with a zig zag stitch. At the ends fold the trim under and sew it to close it off.

3. Wear it

Stupid easy, stupid cheap. This cost me $3.50 for the 2 yards of pom pom, bought it when Joann's was having a half off sale on trim.
Just for the record, the Tory Burch version is $80. Just sayin'.

You can wear it rolled in tight, or wide:

Friday, January 27, 2012
Easy take out alternative dinner!
Sometimes you just want take out food, but you really, really don't want to spend the money! Tonight's dinner is perfect for that!
Sweet and sour chicken is a family favorite in this house, as in, even my 2.5 year old loves it (though admittedly she calls it ketchup chicken). I have a tendency to pair it with brown rice and steamed broccoli, I could probably change that up, but I love it like this!

Tonight I also showed my husband how to roll sushi, and we did a some yummy veggie rolls to go with our chicken. Which, he rolled like a pro, so proud!

The sushi was not up to professional standards, I did not use sushi rice, I just used plain white because I had it in the house. However, I will say that if you're doing a roll with sushi grade fish, spring for the specific sushi rice, the container will last you forever, and if you're already spending $20/lb for amazing tuna, what's another $6 for the right rice?
I won't give a "how to" sushi lesson here, because honestly you can find everything you need at this amazing website, Make My Sushi. I say if it's your first time, go with a veggie roll like we did tonight, cucumber, carrot, avocado. That way you can perfect your technique and have fun with rolling without worrying about wasting expensive ingredients.
**Don't forget the section on making sushi rice, because you need that awesome sticky texture to make really good sushi, and those directions CAN be followed with plain white rice if you have it in the house like I did**
One more note on sushi before the chicken recipe, powdered wasabi is the way to you, it last forever, it's relatively inexpensive (about $3.60), and you can adjust it to your heat-factor preference by adding more or less water as you make it into a paste.
Without further ado, here is the sweet and sour chicken recipe I use, adapted and Frankensteined from like 6 that I've found over the years:
Ingredients:
4 teaspoons cornstarch
6 teaspoons low sodium soy sauce
2 teaspoons garlic ginger paste
1 pound skinless boneless chicken
1/2 cup water
1 tablespoon brown sugar
3 tablespoons ketchup
3 tablespoons rice wine vinegar
3 teaspoons vegetable oil
In a bowl combine 2 tsps of cornstarch, 3 tsps of soy sauce, and the garlic ginger paste. Stir together well, breaking up the lumps in the cornstarch, then toss chicken to coat and set aside.
In a small bowl combine the water, through rice wine vinegar along with the remaining 2 tsps of cornstarch and 3 tsps of soy sauce to make your sauce.
Heat the vegetable oil in a skillet over medium-high heat, add the chicken and cook until browned and cooked through.
Add the sauce to the skillet and bring to a boil. Cook for about 3-5 minutes, stirring constantly until thickened.
As I said before, I serve this over brown rice and broccoli but I bet it would be excellent as a stir fry with peppers and onions and water chestnuts too!
Enjoy!
Wednesday, January 25, 2012
Harry Potter v. Twilight, why Bella will be banned
I fully admit and own up to having read both the Harry Potter series and the Twilight series.
I fully admit and own up to liking both, pouring over books for hours unable to put them down, lost in their little alternate universes.
I fully admit that Bella will be banned in this house until my daughter is 25.
Only then will she be allowed to read the Twilight series.
I never thought that I would be a censorship parent, that I would have a list of books I wanted to make sure my child never laid eyes on. I figured I would be open, understanding, willing to let my little cherubs explore literature til they burst at the seams with word joy.
But, admittedly, I am going to take Stephenie Meyer's books, that I enjoyed so thoroughly as beach reading, that I devoured, and I'm going to hide them until my daughter is well past her years of teenage angst.
Am I going to raise a daughter who is strong and confident in herself and who would never even think of reacting to a relationship in the outlandishly insane way Bella Swan does? Yes. Yes I am.
Am I even going to give her the temptation of reading a really well drawn character who crumbles when her boyfriend leaves her? No. No I'm not.
It is in some ways a testament to Ms.Meyer's writing that I'm even concerned about this. Her characters are rich, whole and extraordinarily life like even though they are in their own ways absurd caricatures. But, alas, so was Candide.
The crumbling and clinging of Bella is in some ways a part of what we all feel in the throws of a relationship, especially in those delicate teenage years. Just amplified to a point where it is clearly unhealthy.
Mr. Potter and company on the other hand actually face hardships, and I'm not particularly sure yet how I will address all of those with my daughter. From Harry's orphaned status, to his mistreatment by relatives, to the fact that every adult he's close to bites the dust, those are going to be difficult, harrowing conversations.
But in some ways I look forward to them because truly there is a message of strength and perseverance, along with a healthy reliance on friendship and love. Healthy.
I could wax poetic for hours about my love for Harry, Hermione, Ron and the rest of the cast of characters, but suffice it to say I would rather have my daughter face death and weird rebirths of true evil than wallow in a breakup.
Wow, that was a fun rant!
Saturday, January 21, 2012
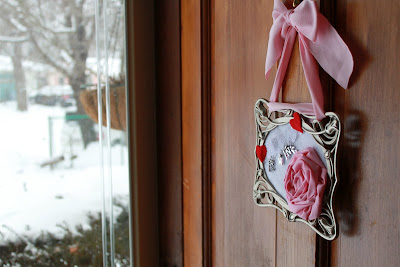
"Be Mine" Valentine's Wreath
After having a circular wreath for both fall and Christmas I needed a total change of pace!
So I scavenged through my house and came out on the other side of scrap felt, an old frame and letters I usually use for wine charms with this:

First, I flipped the frame over and cut out a piece of glittery white felt (left over from my advent calendar) that fit in to the frame. I fired up the hot glue gun, ran glue around the edges and pressed it in to place.

Second, I made a ruffle out of a long piece of pink scrap fabric and rolled that in to a flower. All you do is start at one end and keep rolling the fabric around itself and this is what you get, super easy!


If you've never made a ruffle before just google it, honestly there are 1,000 sites with directions way better than I could ever give.
I placed the flower where I wanted it on the frame and hot glued it in place.
Then I took a piece of lace, cut it to fit the frame on a diagonal, and used jewelry jump hooks to secure little silver letters spelling "Be Mine" to the piece of lace. I got these letters ages ago and Michaels, I'm sure they still have them in the little kids beading section. (I've used them countless times as wine glass charms, that way people don't have to remember what animal they are, they just have remember their initials. Usually easier.)

I glued that in place and used 2 little red felt hearts to cover up the edges and neaten it up a bit.
String a ribbon through the top and you're done!
Voila!


Wednesday, January 18, 2012
Tuna Buna Burgers with lemon basil mayo
In our house we have one rule with our 2.5 year old at dinner time, you don't have to like it but you do have to try it.
We are not a "clean your plate" house, because I feel like that is detrimental to children learning their own bodies, if my child is full I don't want her to keep eating. I want her to understand that when she's full, she should put her fork down and say "I'm done".
That said, encouraging trying new foods often starts with a fun name, which should always involve rhyming. These are Tuna Buna Burgers, and every time my husband makes them they are scarfed down, by all of us!

So to give credit where credit is due, my husband totally made these up, here is his recipe followed by the mayo recipe I use to top them:
In a bowl combine:
2 cans of tuna, drained
1 egg beaten
1/4 cup of breadcrumbs (Italian seasoned or panko, both will work)
1/2 tablespoon of coriander
Dash of salt and pepper for taste
Shape in to 4 patties, cook over medium/high heat in a sautee pan. Cover the pan with a lid or in our house we get extra fancy and use a cookie sheet, to trap the heat in. Turn after 5 minutes, cook for another 5 minutes. This should give them a nice brown crust, but remember everyone's stovetop heat is different so the first time you may want to check them after 3-4 minutes to make sure you don't over cook.
Lemon Basil Mayo:
In a small food processor combine 10 basil leaves, 1/4 cup of mayo, juice of 1/2 a lemon and a splash of red wine vinegar. You can also just mix all this in a bowl if you chop the holy-heck out of the basil. Or maybe that's just my preference since chewing through a leaf in my condiment pisses me off.
Serve on whole wheat English muffins with sliced tomatoes.

I did these tonight with oven fries. Just wash and slice 2 potatoes, toss with about 1 1/2 tablespoons of olive oil, spread on a cookie sheet, sprinkle with salt and bake on the bottom rack at 425 for 12 minutes.
And of course, they were served with a side of broccoli, which my daughter was obsessed with dipping in the mayo.
Enjoy!
Sunday, January 15, 2012
Perfect winter warmer, chipotle turkey chili
When winter hits (which it finally did in Massachusetts this week), I can't help but whip up a batch of turkey chili practically once a week.
Something about it just screams warming, and it's healthy unlike the other foods that I find comforting (mac n' cheese, broccoli cheddar soup, big brownie sundaes).
I've often been asked for the recipe for my chipotle turkey chili but I've never really been able to give it because it's just something that I make, pinch of this, sprinkle of that, so I finally took the time to write it down while I was throwing things in the pot.
Ingredients:
1 onion chopped
4 cloves of garlic, minced
20 ounce package ground turkey
1 Tbsp cumin
1/2 Tbsp coriander
1/2 Tbsp mexican chili powder
1/2 Tbsp oregano
1/2 tsp cinnamon
28 ounce can diced tomatoes
14.5 ounce can black beans, rinsed
14.5 ounce can kidney beans, rinsed
12 ounce can of beer
2-3 chipotles in adobo, chopped (depending on desired spiciness)
Shredded cheese and scallions for garnish
1.In a large soup pot sautee onion and garlic in 2 tablespoons of olive oil for 5 minutes over medium heat.
2. Add ground turkey and cook until the turkey is no longer pink.
3. Sprinkle the mixture with all 5 spices and mix thoroughly to coat the turkey

4. Add tomatoes (with juice), black beans, kidney beans and can of beer to the pot and simmer over medium heat for 15-20 minutes. If you prefer not to use beer you can sub in equal volume of beef or chicken stock.

5. Add chipotles and cook an additional 5 minutes.

**A note on chipotles in adobo, I purchase them and immediately open the can, put them in a ziploc baggie and freeze them. This makes for a much finer chop without tons of juice spilling all over the cutting board and creating an enormous mess.**
Serve the chili hot with cheese and scallions for garnish.

The corn muffins you see in the background are from this recipe, thank you Neelys! These are absolutely amazing, and I like using muffins instead of a dish of cornbread because it's built in portion control.
Tuesday, January 10, 2012
DIY Maternity Shirt
My husband came to me with a work shirt that he was throwing away because the collar was discolored and he asked the very silly question "Could you use this for anything?".


In my house clothing never gets thrown out, it either gets donated, upcycled in to something new, or turned in to a dust rag.
So, since I'm 4 months along in my 2nd pregnancy I decided to give it a maternity makeover.
And I wanted to keep it super simple, in retrospect I would have taken the sleeves in but truly when I was doing this I was thinking of a super easy DIY that wouldn't require any advanced sewing skills.
Here it is, 4 steps to turn a men's button down in to a cute maternity shirt for work or play!
1. Remove the collar using a seam ripper.

2. Cut a piece of double sided bias tape the length of your collar, pin it and sew it in place. If you've never used double sided bias tape, it is truly as easy as it looks. You open it up at the center seam and slip it over the collar of the shirt. You will have equal coverage on the front and back sides.

3. Try the shirt on and mark directly underneath your bustline (if you know your boobs are going to grow more during the pregnancy give yourself 1/2 inch of extra room). In my case this was directly above the third button down, 2 inches below the arm holes. Take the shirt off, turn it inside out.
Measure around your rib cage, cut a piece of elastic 1 inch short of that measurement and pin it to the inside of the shirt, one end of the piece should be on the side with the buttons, one end on the side with the button holes. In my case I used 1/2 inch elastic and sewed down both ends (the long way), I recommend this width elastic. Anything thicker will feel too tight and I'm not sure that thinner would hold up as well.
**If you have never sewed an elastic in place, a quick tip, pin it at the start and end of the elastic, at each side seam, and once in the center of the back. Then pull the elastic to fit the fabric length every 4-5 inches and sew that section. If you overpin the elastic you're likely to get frustrated trying to pull the elastic to fit the shirt for sewing, the pins will just get in the way of your stretching the elastic.**


4. Put the shirt on and fold each side inward from the collar down to the elastic creating a v-shape. Pin in place and sew.
Honestly, you can spend time measuring this out and making sure it's perfect but if you look in a mirror and pin it so that it looks good to you it will be fine. (I hate measuring)
Final product:


I do not know where the horrendous glare off the right side of my glasses came from....but in the interest of not photoshopping my blog pics I'm totally leaving it.
I do have some experience with sewing but I am by no means an expert and this only took me about 35 minutes total. I know that the instructions are not 100% clear, but they're the best I can think of at the moment. If you are thinking of trying this but don't understand something please don't hesitate to ask in the comments and I will try to clarify as best I can!
Subscribe to:
Posts (Atom)