Pages

Showing posts with label home decoration. Show all posts

Wednesday, March 7, 2012

Wall Art Redo


So the husbando and I had a beautiful, delicate, super awesome paper cut out hanging in our room, but it was in this really horrid plastic frame that I just never bothered to replace. We bought this mind you about 6 years ago from a street vendor by Harvard, and it's supposed to bring good luck. We also had this super horrid wine "art" that the husbando was a fan of but I just couldn't bring myself to hang up on the wall, so I combined them!

Started by wrapping the offensive wine picture in fabric, stapled it right to the back.

Then I very, very carefully removed the paper cutout, which was brittle when we bought it I'm sure since it's so delicately cut, but way more brittle being 6 years old.

Then I trimmed it to fit and "ModPodged" the paper directly on to the fabric. This was an extraordinarily delicate process, and I did get some cracks/breakage in the paper but I don't feel that it hurt the finished look.


And yes, when the color started to run I had a little panic but everything turned out fine.


So we have saved two pieces of art that were "meh" and it's the new inspiration for my total bedroom redo which I will be talking about next week. I need loads of ideas.

Saturday, January 21, 2012

"Be Mine" Valentine's Wreath

After having a circular wreath for both fall and Christmas I needed a total change of pace!
So I scavenged through my house and came out on the other side of scrap felt, an old frame and letters I usually use for wine charms with this:

First, I flipped the frame over and cut out a piece of glittery white felt (left over from my advent calendar) that fit in to the frame. I fired up the hot glue gun, ran glue around the edges and pressed it in to place.

Second, I made a ruffle out of a long piece of pink scrap fabric and rolled that in to a flower. All you do is start at one end and keep rolling the fabric around itself and this is what you get, super easy!

If you've never made a ruffle before just google it, honestly there are 1,000 sites with directions way better than I could ever give.
I placed the flower where I wanted it on the frame and hot glued it in place.
Then I took a piece of lace, cut it to fit the frame on a diagonal, and used jewelry jump hooks to secure little silver letters spelling "Be Mine" to the piece of lace. I got these letters ages ago and Michaels, I'm sure they still have them in the little kids beading section. (I've used them countless times as wine glass charms, that way people don't have to remember what animal they are, they just have remember their initials. Usually easier.)

I glued that in place and used 2 little red felt hearts to cover up the edges and neaten it up a bit.
String a ribbon through the top and you're done!
Voila!


Sunday, December 11, 2011

Christmas Wreath

I have a total backlog of blog stuff to post! I had to choose between this, the yummiest breakfast ever, and a little party hosting "cookie swap" blog. So I will start with the Christmas wreath and you can look forward to the other two in the next few days!

Pinterest is such a great place to get new ideas from! I made a Christmas wreath for the front door and started with a 6 foot long piece of foam pipe from the plumbing section of Lowes. Never in a million years would have come up with this if I hadn't seen it on Pinterest.

You will need: Foam piece, duct tape, various fabrics, hot glue, embellishment (I used mini jingle bells)
Here are the steps:
Cut the foam to desired size for your wreath, I cut it down to 4.5 feet.
Cut a piece of fabric 1" wider than the width of the tube, and 1" longer than the length.

Pin the fabric right sides together and sew in to a tube, open on both ends.
Slide the foam piece in to the fabric tube.

Duct tape the tube together.

Pull the fabric together to cover the entire tube and hand stitch in place ends together.
I made a little door hanger with fabric at this point and wrapped it around the top of the wreath, but you could easily sew on a loop of ribbon and it would work just as well.

Next cut three pieces of fabric about 20-25 inches long and 3-4 inches wide. I used three different fabrics for this. Fold them in half the long way, with right sides facing out and sew a basting stitch across the top, do not back stitch at either end. Tie a knot in one end and then holding one piece of the opposite thread begin gathering the material in to a ruffle. (There are awesome videos on You Tube if you search for "how to make a ruffle")

Roll them up counter clockwise in to flowers.

Hot glue the flowers on the wreath, using embellishments in the center if you wish. I think that gems would look really adorable here too. I added a little red sparkly something that I had lying around from a Michaels after-Christmas super sale two years ago.

When I hung my wreath because the foam base is so light it titled toward the embellished side so I had to use duct tape to secure it straight up and down.

Love it!

Wednesday, December 7, 2011

Holiday Decorations

Thought I would take this post to share a few of my favorite holiday decorations in my house.
We had a great time setting up for Christmas on Sunday, we put on A Christmas Story, busted out the ornaments, and repeatedly told our daughter that Christmas was still REALLY far away, and Santa only brings a few things. This is something we've been reiterating lately, lest she get caught up in what she sees in her rare moments of TV watching, or hears from playmates. We are firm believers in making Christmas about sharing a special time with family and friends and enjoying each others company, and being grateful.

That said, I do LOVE how the house looks decked out for the holidays and I think there's something super special about welcoming the season by bringing some additional sparkle in to our house (because honestly, sparkle rules).

Ornaments hung from our dining room chandelier with regular wrapping ribbon, just curled the ends. I would have used fancy ribbon but it's a pain in the bottomus to get through those teeny ornament hanger holes.

This is a super fun cookie jar that my aunt bought us a few years ago and every time I unwrap it I smile! Cookies only last in there for about a day, but it's so whimsical and fun! The other item is a hot chocolate frother. You may have seen these out and thought "That's ridiculous why would anyone buy that?" well let me tell you, you're missing out if you left it on the shelf. It delivers hot chocolate that is unparalleled and kids love using it. If you see one for $15 or under get it!

This is my little snowman family, from left to right, a sugar bowl, creamer, salt and pepper shaker. So tacky. So fun. Sometimes you've got to roll with the ceramic snow figurines and revel in your holiday lack of taste. Own it.

Monday, December 5, 2011

Mini Mitten Advent Calendar

This project is super fun! I created a mini-mitten advent calendar for my daughter to start counting down the days until Christmas. We are moving a Santa hat from day to day, but when she's older I'm going to put little activities for the day in each mitten, like make hot chocolate or do something special for a friend.

It is fairly simple, I used a sewing machine for a lot of this, but I would imagine that a hot glue gun would do the job as well, I'm just not sure that it would last as long as sewing.

What you will need:
Felt, ribbon, foam board, hot glue gun, sewing machine, scissors

1. Cut a mitten out of the foam board, use it to trace 50 mittens. In my case I used 20 red, 20 green and 10 white.

2. Cut small shapes out of the foam board and write 1-25 on them with a Sharpie. Let dry.

3. Divide the mittens in half. Hot glue the numbers and small embellishments to one set of mittens.

In my tradition of refusing to use photoshop on my blog I would like to note that yes, I'm aware that my iron needs a new cover.
4. Arrange the mittens that do not have embellishment on them uniformly apart on the ribbon. Sew a straight line down the ribbon, attaching the mittens.

If I didn't already have the advent calendar plan in my head I would have just used this as a garland because it's super cute by like this.
5. Place the embellished mittens (in descending order) over the mittens that make up the garland. Pin in place.
6. Sew each mitten, leaving the top part open to use for either a "marker" (like our Santa hat) or to insert messages/activities.

Thursday, October 13, 2011

Sweater Pumpkins!

I had a sad, sad sweater, she's been sitting in the back of my winter drawer for an incalculable amount of time.
This is her before picture, covered in pills and pathetically downtrodden:

Four steps later she is now two fun pumpkin decorations!

Step 1: Cut off sleeves of sweater up to the elbow.

Step 2: Turn sleeves inside out and sew the cut end together in a gather:

Step 3: Stuff the sleeves with either the leftover sweater or filler until they are a nice round pumpkin shape, leaving about 2-3 inches at the top by the wristband. I used the leftover sweater for two reasons. The first being that I couldn't wear that thing out in public again, the second being that I could stretch the sweater material really far without showing my filling since it's all the same color.

Step 4: Twist the wristband up and tie off with twine, then wrap the twine around creating a pattern of grooves on the pumpkin.

Viola:


I love the way these look on the once empty shelf in my kitchen, and they are "fall neutral" enough that they can stay up through Thanksgiving.

Happy Crafting!

Tuesday, October 11, 2011

Drawing a blank!

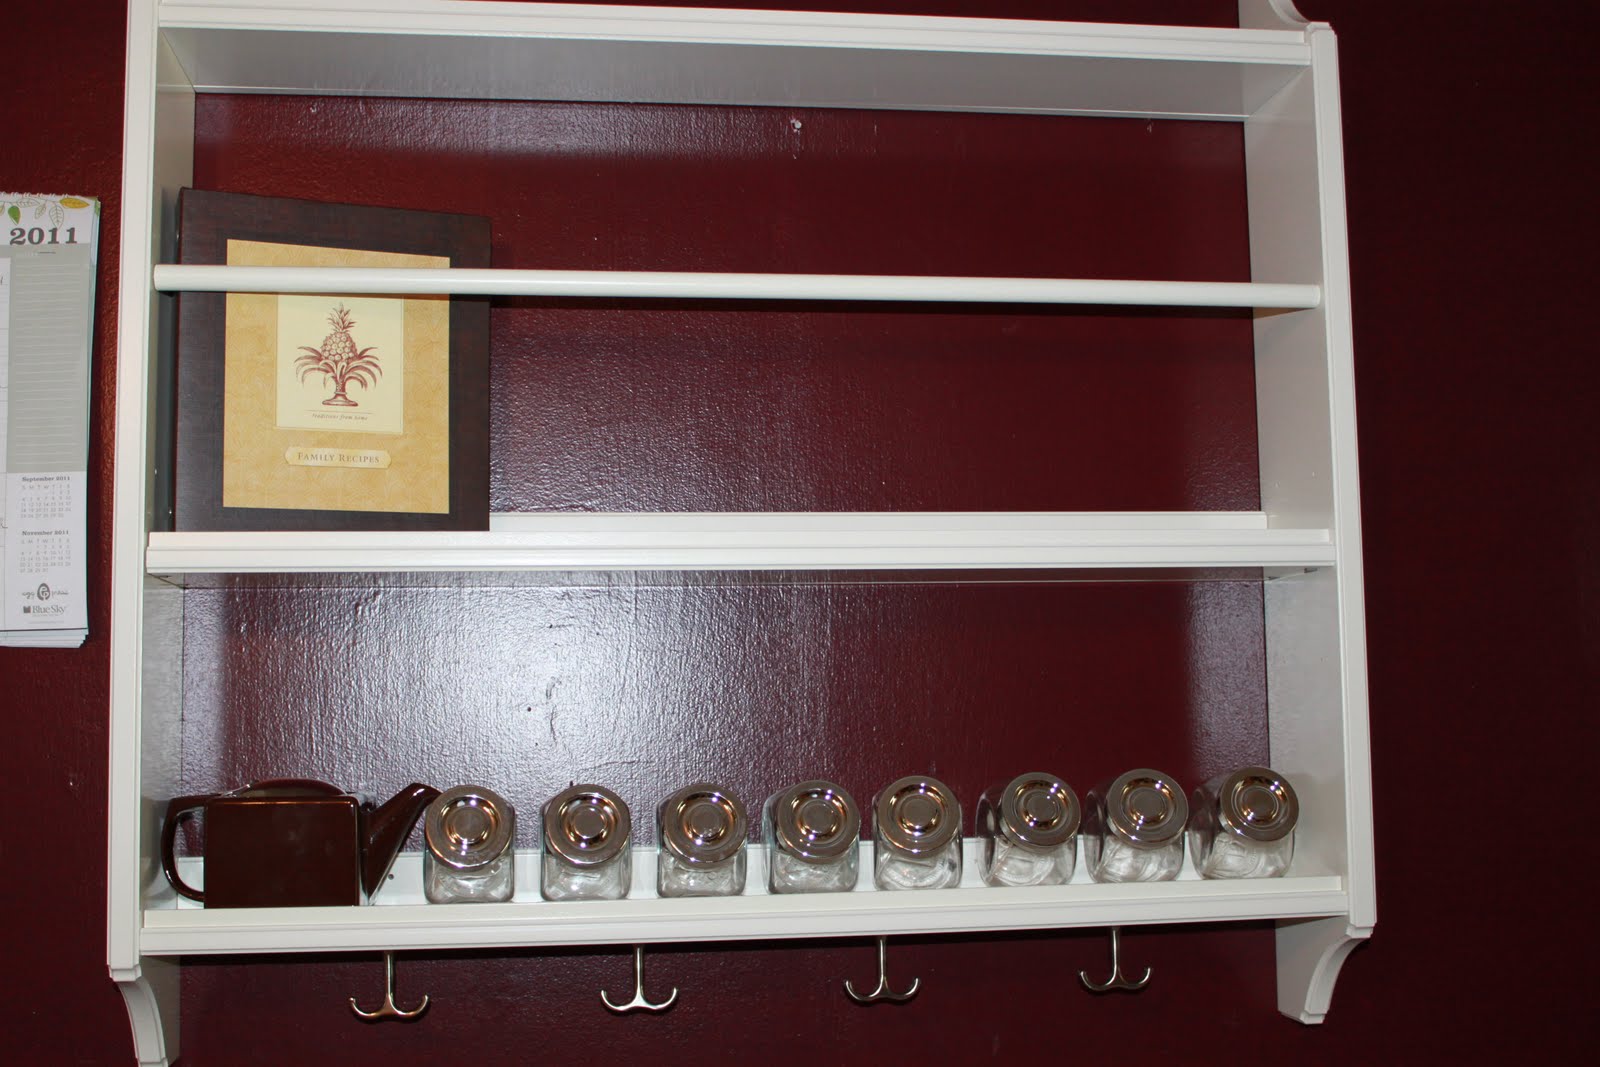
So on a "just looking" trip through IKEA on Saturday the husbando spotted an awesome find for the wall in our kitchen.
We've been wanting something a little more "country" but also functional because we have nearly zero cabinet and counter space.
So we came home with this, which we both really like:

Wow my wall is not that shiny in real life FYI.
The problem is that now I'm drawing a total blank on what to put in it. I like the little spice jars and intend to actually transfer my spices to them probably tomorrow.
I know that I want to hang mismatched vintage tea cups from the hooks (plan on asking my grampa what he has laying around this weekend), but other than that I literally have no ideas.
Do I put some of my big platters in the plate section?
Jars of dry goods like rice?
A goldfish?
Help!

Thursday, September 22, 2011

Rickrack Fall banner

I was going to post this as a DIY, but the whole purpose of the "Autumn" rickrack banner for me is to use up scraps of fabric, and just have fun! The backing on each banner piece is an old nightgown, so no need to sew the seams (sweet!), and all the other fabrics are scraps.
The best part about a banner like this is that it's supposed to look "country homemade", so if you're just learning how to sew this is the perfect project. Have fun with color, pattern mixing etc.
As I look at the photos I think that mine is a little too plain, might have to be jazzed up with a fabric flower or two...hmmmm.

Monday, September 19, 2011

20 minute fall wreath

Easiest wreath ever!
First, purchase a straw wreath wrapped in plastic. They are $2.99 for a 14" wreath at A.C. Moore, like 1/3 of the cost of a similar sized styrofoam one. I don't know why since they're much sturdier and have an overall more appealing shape.
Second, cut long strips of a fall-colored fabric and wrap them around the wreath, knotting each new piece to the already wrapped ones like so:
If you leave the plastic on, you will avoid getting stabbed by renegade pieces of straw, which is always good.
Third step, create a few fabric flowers from loose bits of fabric, old jeans, t-shirts, anything that matches your fall motif. All you have to do is cut two inch wide strips and twist them, keep twisting and they will curl in on themselves to create these delightful flowers. Then hot glue those bad boys to your wreath and VOILA:
I braided some of the leftover fabric to hang the wreath with, but I probably would have preferred to use a really pretty piece of ribbon. So there you have it! Enjoy!

Sunday, September 4, 2011

Two minutes til guests arrive??

Yesterday we had the pleasure of hosting one of husbando's friends and his family for a BBQ, I love hanging out with other couples who have kids (most of our friends are still fancy free), because I don't worry as much about my house, I leave the toys everywhere when they come over, I don't apologize when my daughter grabs someone's leg and forcibly drags them in to a room. It's so much more relaxing!
But I did look at my table, with a white table cloth on it, and a basket of rolls (homemade from this recipe) and it just looked bare. I had no flowers in the house, this is the seasonal "dead zone" so I couldn't do a quick theme piece, so I did this:
Got to showcase my beautiful tea cups (though I wish I had one with a pattern to set it off), and it was a use for the 1,000 fabric flowers I have hanging around the house!

Monday, June 6, 2011

Big girl room- Mickey Mouse Clubhouse Theme

The husbando and I transformed our guest room in to Belle's "Big Girl" room on Sunday.
She just turned 2 last weekend, I'm completely not prepared to give up the safety and security of her crib, I need to know where she is, I'm thrown in to a fit of panic every time I picture her in the gigantic bed we got her.
But, this isn't about me, and she's ready to move on, so I'm in the process of getting over myself.

I'm almost embarrassed to post the before photos exceptno one reads this blog yet so I'll do it now before I blast it to the world, and then decide if they're too heinous to keep up!
Before:
After, complete with Mickey Mouse ears that the husbando cut out of wood and I covered with shiny black fabric, anda bed skirt that I sewed to look like MM's shorts!
I didn't take DIY pictures for the bed skirt, but it's super easy, basically take a store bought bedskirt or a large piece of fabric and cut out a square piece in the center, sew the sides, then add two white ovals just above it. I won't lie, sewing ovals is way easier by hand than on a sewing machine, unless you've got mad skill, that I totally don't have.